

Anti-sway bars act to improve steering control and mitigate body roll through the torsional effect they have on opposing wheels of the vehicle. Body roll is reduced as the bar transfers the torsional pressure exerted on the inboard wheel during a turn to the outboard wheel. Weight more evenly distributed to all four wheels keeps the vehicle more level.
Oversteer is often seen in vehicles with a heavy rear end compared to the front end, lightweight rear bars compared to front bars, and characterized by the rear end of the vehicle “spinning out.”
This is where Hellwig Products and its replacement rear stabilizer bar comes into play. Hellwig has been making suspension enhancement products such as air springs, helper springs and stabilizer bars for decades.
Hellwig Raises The Bar
The Jeep Cherokee is one of the most versatile SUVs in the world. It can go from grocery getter to to rock crawler–it all depends on how you set it up and how you choose to modify it. In general, and especially for daily driving and towing duties, the original equipment (OE) anti-sway bar (or stabilizer bar as some call it) under the tail of the Cherokee could use some help. It’s not very beefy, measuring just 9/16-inches thick, and many Cherokee owners complain about how much oversteer, understeer, sway and body roll they observe.
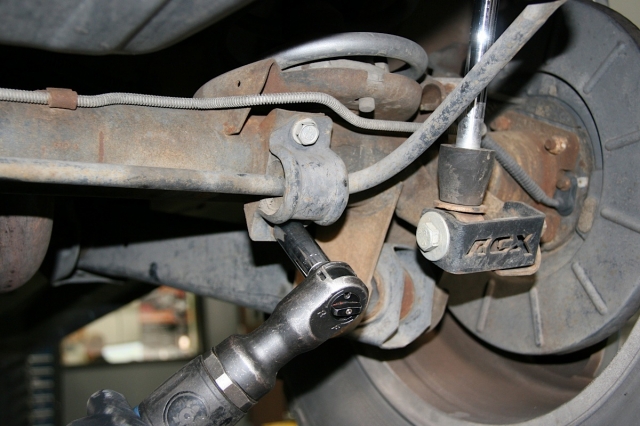
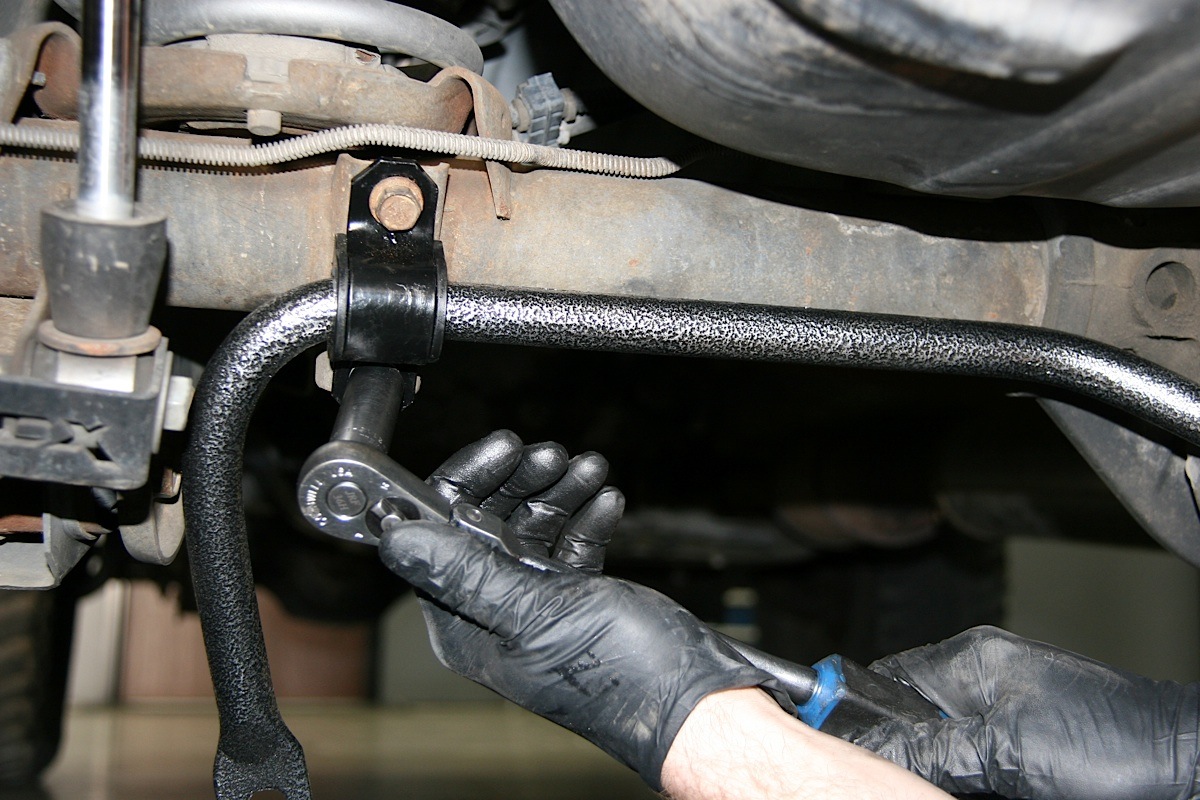
The first step of the installation process was removal of the OE stabilizer bar (pictured), end links, as well as the upper brackets. We retained the OE hardware for mounting the stabilizer bar to the axle and the two U-brackets that secured the end link assemblies to the vehicle's frame, as this was needed for re-assembly. All other hardware was included with the Hellwig replacement stabilizer bar kit.
Upgrading the rear bar can bring about a marked difference in steering performance and cornering stability. Doing the same for the front can also offer improvements in vehicle handling performance, but the difference is not always as noticeable, particularly in this application.
Hellwig has engineered, designed and currently manufactures rear stabilizer bars for the 1987 to 2001 Jeep Cherokee (Part No. 7568), 1993 to 1998 Jeep Grand Cherokee (Part No. 7613), and the 1999 to 2004 Jeep Grand Cherokee (Part No. 7644). The Hellwig chromoly bars are a giant step up from the factory part. “Our bars are hot formed and heat treated for greater strength and fatigue resistance.” said Melanie White, Hellwig Marketing. “And all of our sway bars, brackets and bushings are still made in the U.S.A.!”
The torque or twisting resistance of a stabilizer bar changes with the square of its cross-sectional area. In other words, the ability of a stabilizer bar to help keep both sides of the vehicle flatter on the road and the steering better under control with even a small increase in diameter increases exponentially.
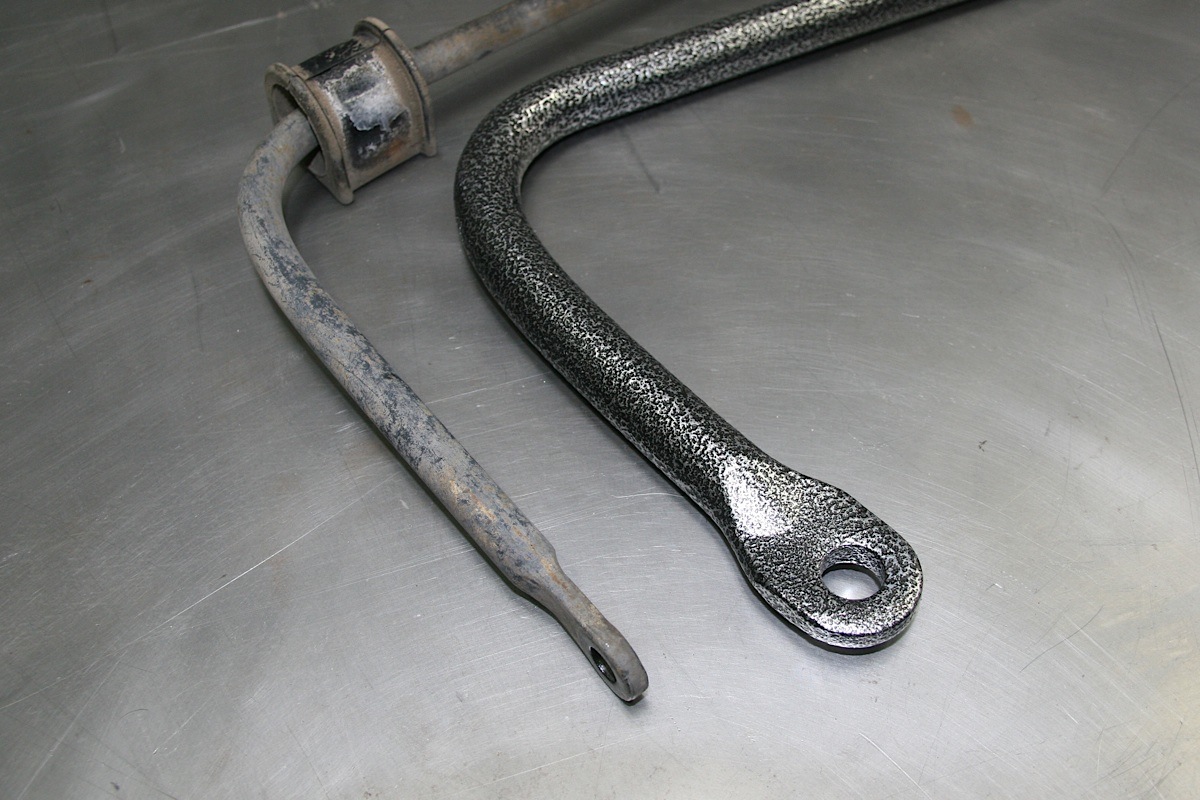
The comparison between the 9/16-inch OE bar (left) and the 7/8-inch Hellwig stabilizer bar (right) shows the dramatic difference in size.
The Hellwig replacement bars for the Jeep Cherokee and Grand Cherokee are 3/4-inch (7568) and 7/8-inch (7613 and 7644) in diameter, so they are thicker, stronger and have more torsional rigidity than the OE unit. Melanie White shared, “Our 7/8-inch bar is about 25- to 40-percent stiffer than the factory bar.”
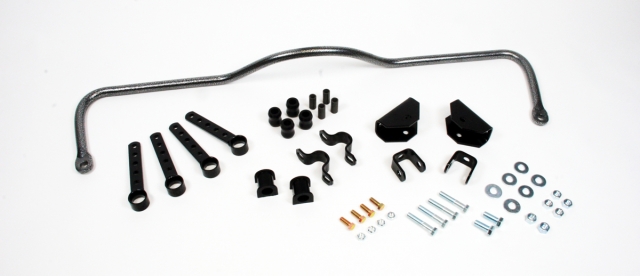
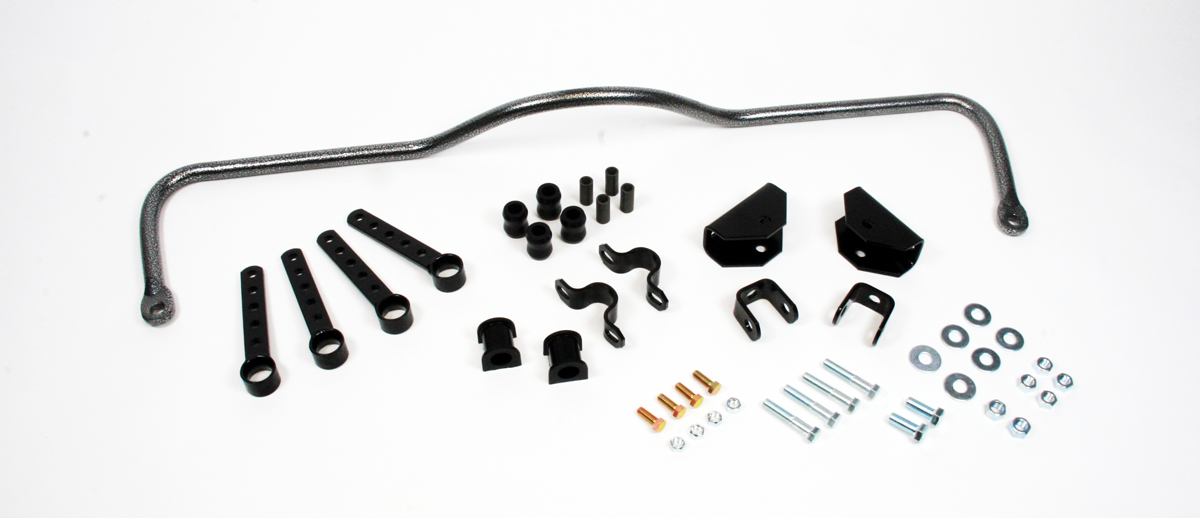
The installation subject was our 2002 Jeep Grand Cherokee; Hellwig rear stabilizer bar kit No. 7644 was used. The kit included a 7/8-inch thick stabilizer bar, poly bushings, bushing sleeves, end links, U-brackets and hardware. The Hellwig kit included instructions with diagrams and illustrations that make the job easy for the DIY enthusiast, and the installation can be performed with simple hand tools.
Our 7/8-inch bar is about 25- to 40-percent stiffer than the factory bar.” Melanie White, Hellwig Marketing.

Getting Work Done
To begin the installation, the OE rear stabilizer bar must be removed. Retain all of the hardware that mounts it to the axle, as it will be used again to install the replacement. Also remove the OE end links that attach the stabilizer bar ends to the frame; these will be replaced by new Hellwig adjustable-length end link assemblies, so you do not need to keep the OE end inks.
Using the U-plates and D-bushings included in the kit, we installed the Hellwig stabilizer bar, but left it slightly loose for final adjustment once the Hellwig end links were installed and ready to be hooked up.
However, in the case of our 2002 Jeep Cherokee, it already possessed a suspension lift kit that had included drop brackets for the ends links, so we cleaned up and kept the drop brackets to take into account the suspension lift when we re-installed the new Hellwig adjustable-length end links.
We installed the new D-shaped polyurethane bushings that come with Hellwig kit on the replacement stabilizer bar in as close to the same place as possible as they were on the OE stabilizer bar. Then the stabilizer bar was attached to the axle in the same location and position as the OE stabilizer bar was mounted.
Make sure to leave the newly installed Hellwig stabilizer bar slightly loose when first mounted to the rear axle. This is important, as you will need to be able to move the stabilizer bar to make final adjustments when connecting it the link ends once you have assembled and mounted the link ends to the vehicle.
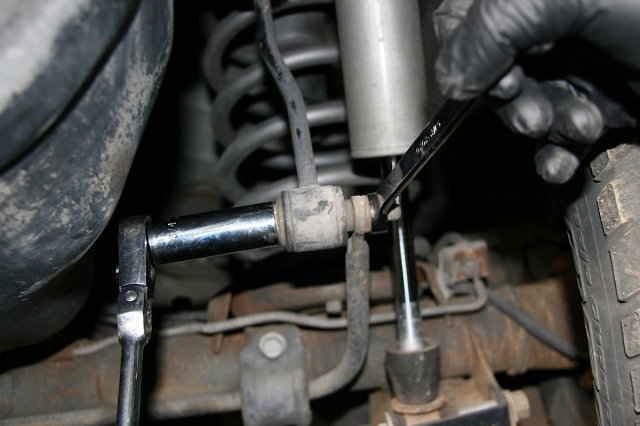
At this point, we assembled the stabilizer bar end link assemblies. First, the poly-bushing halves and the inner sleeve tubes were inserted into the outer welded sleeves of the end link assembly halves before they were bolted together. The poly-bushing halves and inner sleeves should be lightly greased prior to assembly. A hammer can be used if needed to push the inner sleeves into the bushing halves, but take care not to damage the bushings.
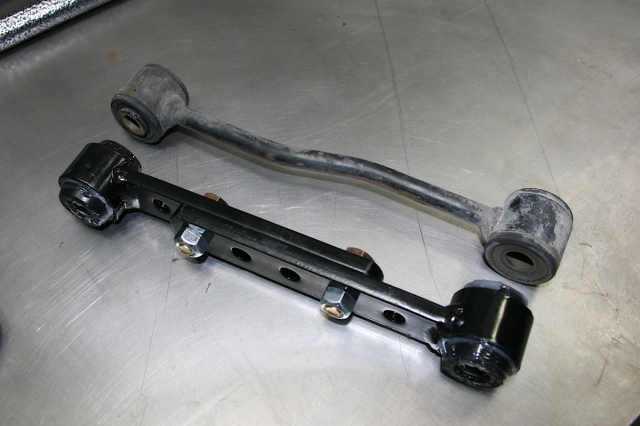
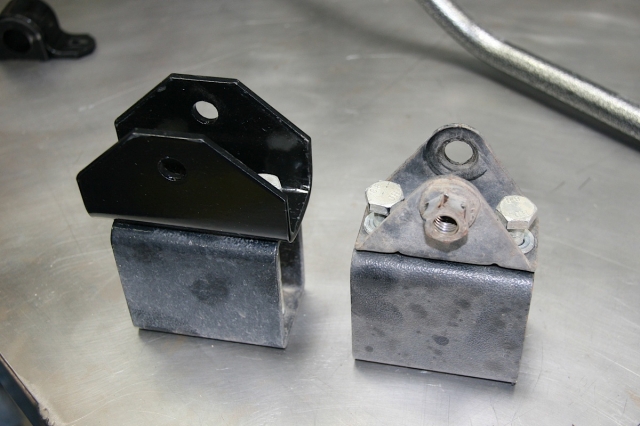
For comparison purposes we placed one of the assembled Hellwig two-piece adjustable end links next to the OE end link to show the difference in size and sturdiness. We also compared one of the Hellwig upper U-bracket mounts for the end link that attaches to the vehicle's frame to the OE end link bracket; also seen are the drop blocks retained from the suspension lift kit existing on the Grand Cherokee.
The larger brackets supplied in the Hellwig kit were also attached to the lift kit brackets (using hardware we supplied) that had come off of the vehicle and been cleaned up, and then the two-bracket stack was re-attached to the vehicle frame where the lift brackets had been, using the original hardware.
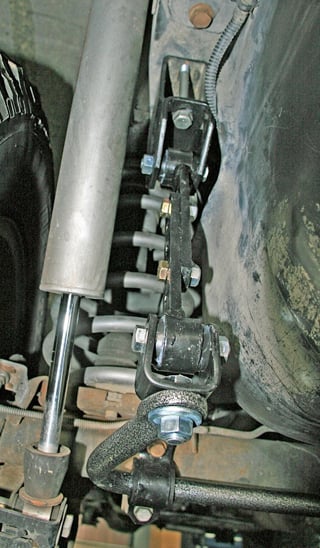
Upper and lower brackets were attached, and end link assemblies were adjusted and tightened.
The two end link assembly halves were then assembled, one into the upper bracket, one into the lower bracket, using the 7/16-inch bolts and locknuts. We assembled the two halves of links so that the finished links would be as close to the same lengths as the OE links. Tighten these 7/16-inch bolts to between 70 and 90 foot-pounds of torque.
The two end link assembly halves on each side were joined together next using the 3/8-inch bolts and locknuts provided in the kit. Be sure to align the welded offsets when assembling the halves to get the finished link set straight in line.
Two bolts should be placed in each link assembly, using the various holes on the end links to adjust the length to the best fit. Leave these 3/8-inch bolts loose for final adjustments.
Fine Tuning
Adjust the Hellwig stabilizer bar that is already mounted loosely to the rear axle left and right so that it is centered as best as possible and so that the end links are as even from side to side as they can be. Fit the lower ends of the end link assemblies into the small brackets on the ends of stabilizer bars and attach them together using the supplied 7/8-inch bolts and locknuts.
Once all the various parts of the entire system had been connected and fit together properly, and with all the adjustments made, the hardware was gone back over and tightened to proper torque settings. For all the 3/8-inch bolts, that is between 20 and 30 foot-pounds; for all the 1/2-inch bolts, that is between 50 and 70 foot-pounds.
After the assembly had been completed, we mildly bounced the vehicle up a down a few times to check for clearance of all undercarriage components such as shock absorbers, spare tire, fuel tank, exhaust pipes, brake and fuel lines. Then we took the vehicle out for a short test drive and made sure everything felt fine, then came back to our shop and checked the installation for any readjustments that may have been needed.
The installation was easy and took just a couple of hours to perform using some basic hand tools. No specialized equipment was needed and the job can be done in your home garage or driveway. We recommend the vehicle be parked in a level location, the parking brake applied and wheel chocks used for safety.
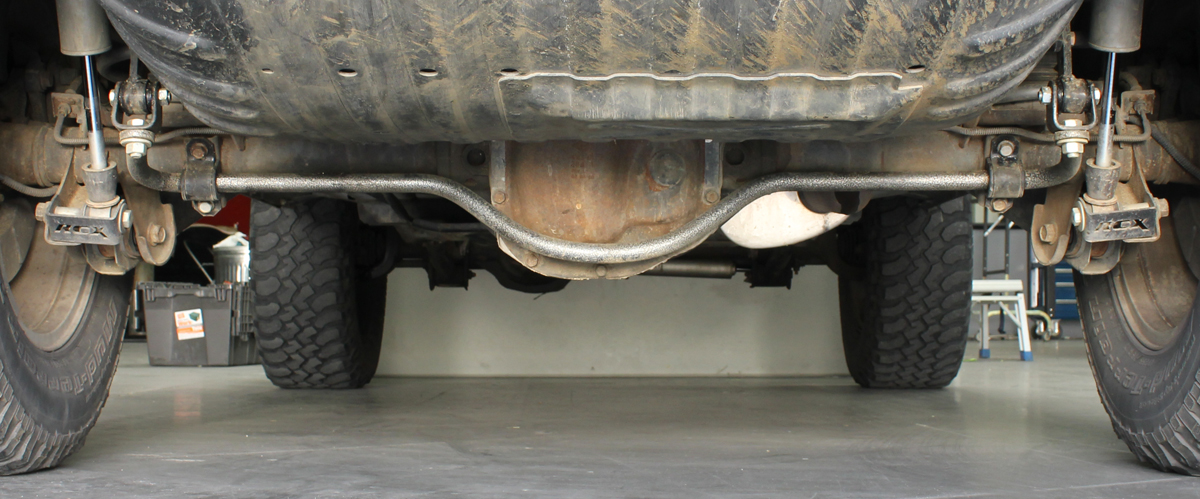
The Hellwig anti-sway (stabilizer) bar will help reduce body roll by transferring pressure exerted on the inboard wheel to the outboard wheel during a turn.
Test Drive
We performed before and after seat-of-the-pants testing of the Jeep Grand Cherokee to get a feel for how much difference there was in the resistance to body roll between the OE stabilizer bar and the Hellwig stabilizer bar. The difference after installation of the Hellwig replacement stabilizer bar felt like night and day, and hard-charging turns through a corner went from a hard heeled-over body roll to a pretty calm and flat turn.
The improvement that the installation of the Hellwig replacement stabilizer bar will make in the Grand Cherokee’s handling behavior during trailer towing will also be substantial. Judging by the before and after stabilizer installation videos of vehicles towing large trailers that are available for viewing on the Hellwig website, you can see for yourself.

We noticed a big difference in this 4-inch-lifted Jeep Grand Cherokee’s handling and steering performance after the installation.
We also recored our own videos (seen below) of the 2002 Jeep Grand Cherokee undercarriage before and after the installation. We noticed a big improvement in the steering and handling performance once the larger and stiffer Hellwig bar was installed. Body roll was minimized and oversteer was mitigated, even under hard cornering.
Steering control of the Grand Cherokee through turns and during quick lane changes was greatly improved, and moreover, the driver’s overall confidence in the vehicle’s ability to handle high-speed course corrections without experiencing gross oversteer was solidified. Check out our before and after test video below:


